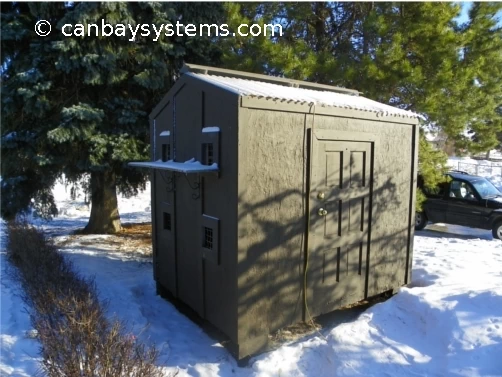
 Here is a good little loft. It works very well for me. It is a spin of a loft that I have found on the Internet. It is inexpensive to build, well ventilated and works well for up to 15 pairs of rollers. I keep my breeders to about 10 -12 pairs because during the summer rains when it gets very humid the floor gets wet and I prefer to keep it dry. The ventilation works very well with no drafts on the pigeons or their nests. There is included 2 kitboxes and a spare kitbox that I use for starting youngsters and some times separating adults. I had step
by step photos, but I lost them, I will draw the plans out for my loft and you are welcome to use them as is or try this site for more ideas.
Here is a good little loft. It works very well for me. It is a spin of a loft that I have found on the Internet. It is inexpensive to build, well ventilated and works well for up to 15 pairs of rollers. I keep my breeders to about 10 -12 pairs because during the summer rains when it gets very humid the floor gets wet and I prefer to keep it dry. The ventilation works very well with no drafts on the pigeons or their nests. There is included 2 kitboxes and a spare kitbox that I use for starting youngsters and some times separating adults. I had step
by step photos, but I lost them, I will draw the plans out for my loft and you are welcome to use them as is or try this site for more ideas.
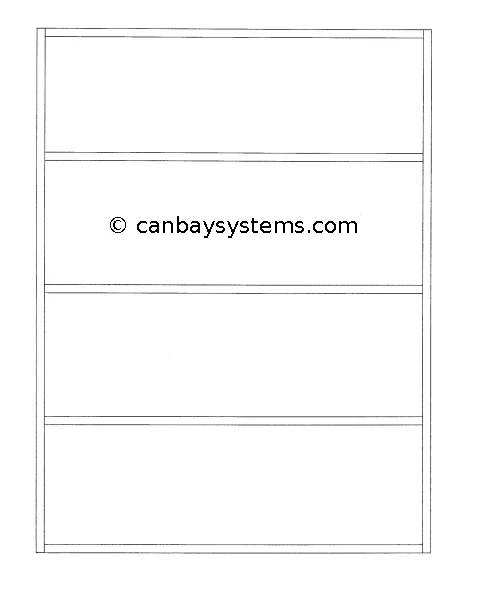 Using 2x4 studs frame the pigeon loft floor, the outside dimensions are 6ft.wide x 7ft. 11 1/4" inches.
Make sure the 2x4's are placed on edge. It will make the floor much stronger. Using 24" centers will prove to be strong enough. Then cover the floor with 5/8 tongue and grove OSB board. It is specially made for sub floors. Trim it carefully so that non protrudes past the joists.
Using 2x4 studs frame the pigeon loft floor, the outside dimensions are 6ft.wide x 7ft. 11 1/4" inches.
Make sure the 2x4's are placed on edge. It will make the floor much stronger. Using 24" centers will prove to be strong enough. Then cover the floor with 5/8 tongue and grove OSB board. It is specially made for sub floors. Trim it carefully so that non protrudes past the joists.
 You are now ready to frame the door. I used an old wooden house door. I cut it down to 61" high, now you might want to adjust the wall height and the door height I did hit my head twice and both times were .... well a sore head. Cut two studs to fit between the floor and the beveled 2x4's and fasten them into place allowing 1/8" of space on the sides of the door. Next cut a header 2x4 that is 1/4' longer than the door is wide. Fasten this 1/4" higher than the door is tall. Make sure every thing is true, straight and square. From the out side using 2" screws fasten the wall to the door studs.
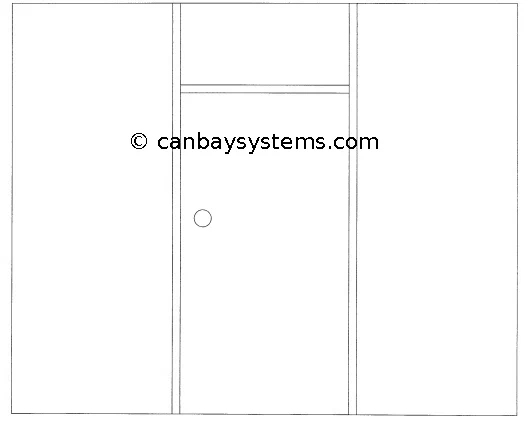 Try your door (before cutting it out) it should fit correctly. If you are satisfied with the fit, cut out the OSB where the door goes.
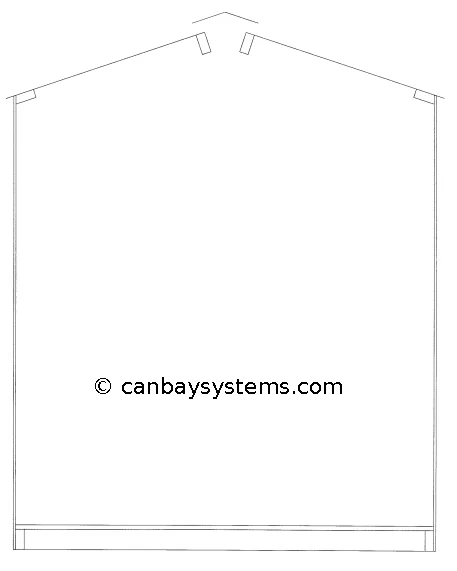
 These short screws will not go through the trim and the finish trim will look good. Starting on the wall with the door attach an 8ft-1x4 to the top of the wall. Make sure that it is 1/4" lower than the plywood to allow for the roof material. This board goes from end to end of the loft. Next measure from the under side of this board to the bottom of the wall. Cut a 1x4 to length and attach it flush to the edge of the wall. Do the same to cover up the OSB joint screwing from the inside except at the bottom where 4-2" drywall screws should be used to attach it to the floor joist. Trim out the door in a similar fashion but stay back from the edge 1/8"-1/4" to allow the door free movement. It is time to trim the end walls.
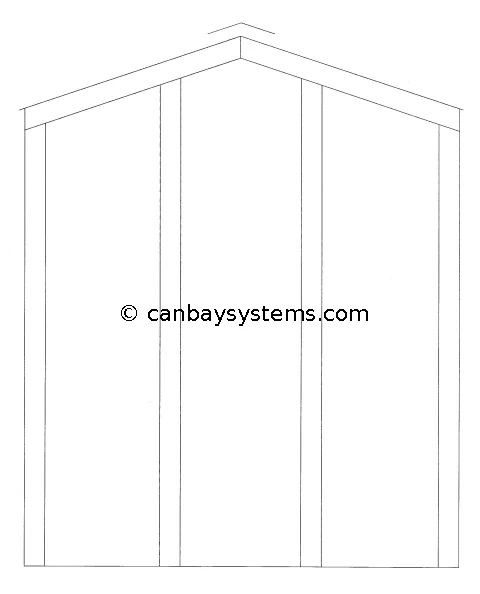
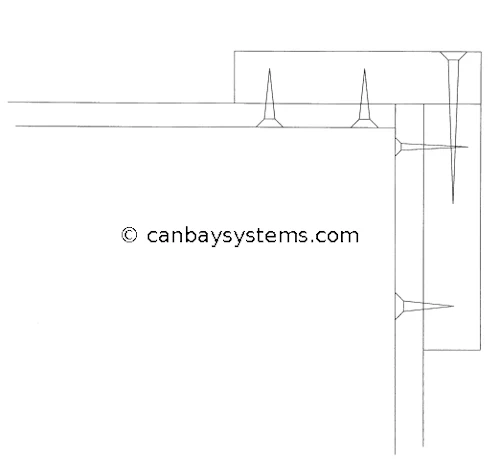 Then attach the top end of the other in place make sure the OSB is tight together and finish screwing the top trim on. Do the edge trim to overlap the other trim. There is a detail of the corner showing what it looks like from the top. Then using the same angle mark and cut the other two pieces of trim. One should cover the joint between the OSB and the other should be equal distance from the other edge to make it look balanced.
 You are now ready to put the roof on. I used a clear green house material. It is great in the summer, but snow can be a problem. Also having all that light in the kit box was a problem. I eventually put 1/4" plywood under the clear roof over the kit boxes, because in spring the birds would think it was time to nest and it caused all sorts of problems. Now they are sure it is the dead of winter. I would suggest using metal roofing. Cut it to 3' lengths. This should give you a small over hang.
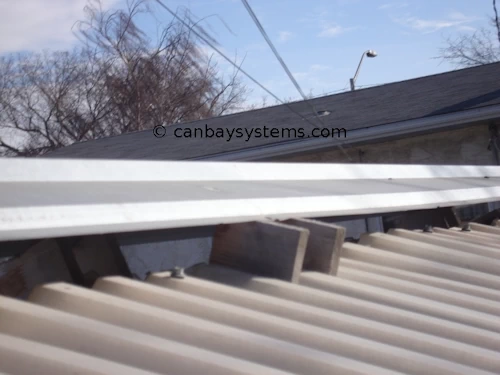
After the roof is put in place you will have a vent that runs the length of the roof. Cover this using an 8' metal roof cap resting on spacers. Make the spacers out of wood, you will need 6 per side 3/4"x2"x2 1/2" long.
You are now ready to put the roof on. I used a clear green house material. It is great in the summer, but snow can be a problem. Also having all that light in the kit box was a problem. I eventually put 1/4" plywood under the clear roof over the kit boxes, because in spring the birds would think it was time to nest and it caused all sorts of problems. Now they are sure it is the dead of winter. I would suggest using metal roofing. Cut it to 3' lengths. This should give you a small over hang.
After the roof is put in place you will have a vent that runs the length of the roof. Cover this using an 8' metal roof cap resting on spacers. Make the spacers out of wood, you will need 6 per side 3/4"x2"x2 1/2" long.
 Pre drill holes in the roof cap for screws 3 per side close to the edge. Then using 3" screws working on one side first start the screws into the 2x4. Place the spacers under the roof cap and gently tighten the screws. It is tricky getting the screws right because of the angle. When I first made my loft the roof cap rested directly on the roof sheeting only allowing 3/4" of vent. This wasn't enough during hot weather. I put the spacer blocks in as an after thought and they work great. During windy weather I get almost no snow and during rain there is a tiny bit of splash coming in. I think it is the way to go.
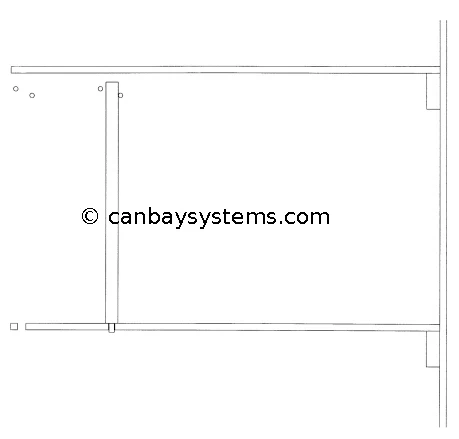
 Take 1x4 and run it through a table saw to cut out a strip as shown in the following drawing. Use it to hold plexi glass in place. First cut and attach the bottom piece from the outside. Put in your plexi glass and attach the top and sides screwing from the inside with 1" screws. Finally to prevent rot, caulk the window to prevent rain from getting into the space between the glass and the frame.
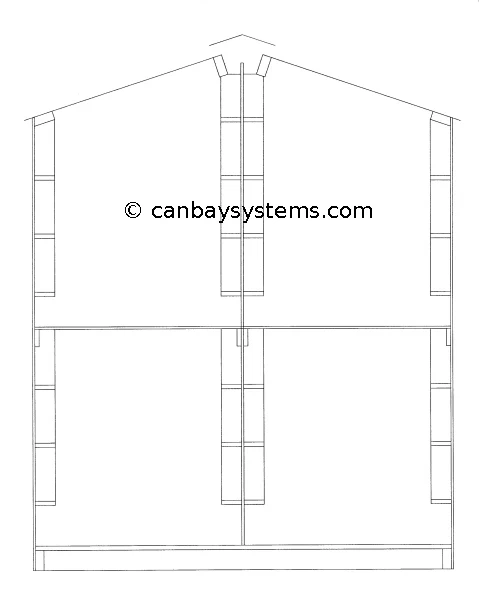
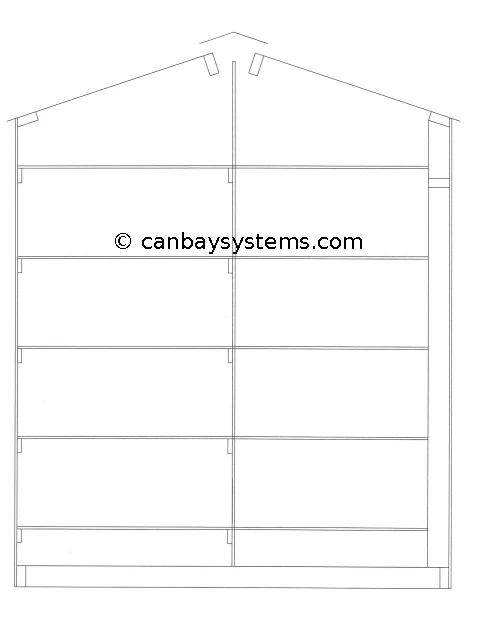 I use the extra nests for storing things but I am always tempted to put an extra pair or two in. Last year I did have 15 pair and my loft worked but I did need to clean it regularly to keep it from getting wet inside. With only 10 pair it stays dry. I will rebuild it as the drawing shows. There are many advantages to this layout. 1st the loft will be easier to keep dry during cool weather and rains. 2nd the nests will be 2'x3' and this will be a roomier if you want to keep your pairs separated during breeding. It is the only way to know for sure who the parents are. Keep the bottom nest 6"-8" of the floor. This gives sqeakers a place to hide from driving cocks and it is part of the ventilation system. The air is directed across the floor where it can keep things dry with out being drafty on the babies.
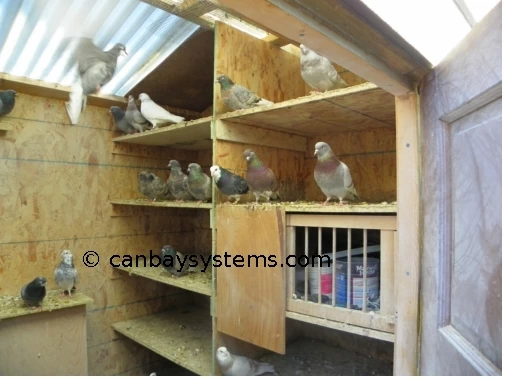
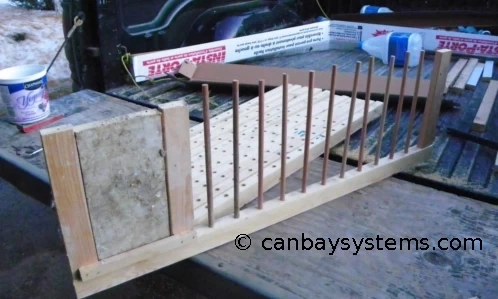
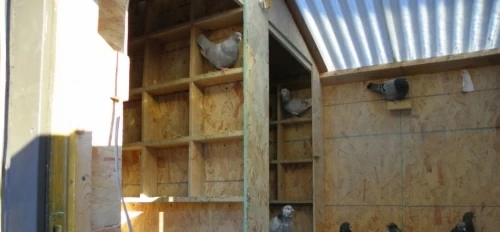
Here is a photo of the new nests with no fronts. I will be putting fronts on soon, but for the winter when the weather is very cold it makes it so much easier to water the birds if I take the kit box doors of and take the nest fronts of. Also no nest fronts means no nesting.
I use the extra nests for storing things but I am always tempted to put an extra pair or two in. Last year I did have 15 pair and my loft worked but I did need to clean it regularly to keep it from getting wet inside. With only 10 pair it stays dry. I will rebuild it as the drawing shows. There are many advantages to this layout. 1st the loft will be easier to keep dry during cool weather and rains. 2nd the nests will be 2'x3' and this will be a roomier if you want to keep your pairs separated during breeding. It is the only way to know for sure who the parents are. Keep the bottom nest 6"-8" of the floor. This gives sqeakers a place to hide from driving cocks and it is part of the ventilation system. The air is directed across the floor where it can keep things dry with out being drafty on the babies.
Here is a photo of the new nests with no fronts. I will be putting fronts on soon, but for the winter when the weather is very cold it makes it so much easier to water the birds if I take the kit box doors of and take the nest fronts of. Also no nest fronts means no nesting.
 Following are a few photos of me reconstructing my nest fronts from 2 foot to 3 foot. In the first photo I show a 3/8 flat bit that I used to drill holes with to accept the dowels in the nest fronts.
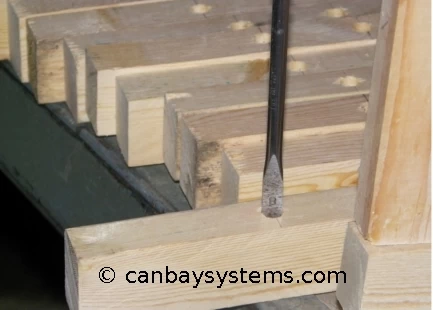
 The long point on the bit acted as a pilot bit where I needed screws. Using parts from my old fronts I am putting together a new front. I reused the door, dowels and end upright. I need to put the top rail next. Here it is finished. Note the nail head that the black line is pointing to. It goes through the uprights and into the nest door.
 This makes an excellent hinge. Also note the two small dowels in the bottom of the front, these fit into holes I drilled in the bottom of the nest box. I will use a finishing nail for the latch. There are two pieces of wood .5 x .75 x 6 inches long. One serves to stop the door from opening to far and the other stops it when it is closed.
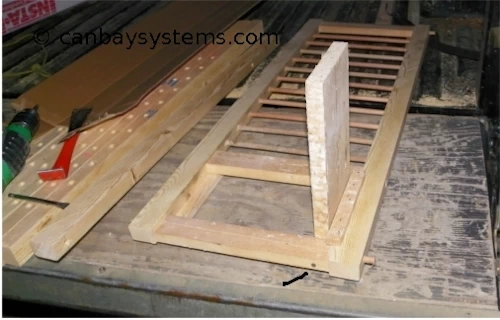
The nest fronts are movable. There are 2 positions that they can go. Note the screws, the nest fronts can be lifted up and the bottom slid forward to remove.
This makes an excellent hinge. Also note the two small dowels in the bottom of the front, these fit into holes I drilled in the bottom of the nest box. I will use a finishing nail for the latch. There are two pieces of wood .5 x .75 x 6 inches long. One serves to stop the door from opening to far and the other stops it when it is closed.
The nest fronts are movable. There are 2 positions that they can go. Note the screws, the nest fronts can be lifted up and the bottom slid forward to remove.
 Then you can choose to put the front into the forward position or 6" further in. This is very useful to me. When I want to be sure of the parents I can lock the pair up with the front in the forward position. When the hen has laid the first egg. I put the nest front to the back position and let the cock out for a few hours. He will ascertain that that is his nest, which hasn't been claimed while he was locked up because the front was in the forward position. Now the nest box door can be opened up and the birds can be free in the loft. This works well for me, it is not 100% proof of who the parents are but it is a lot better than an open loft. Using this system I have never had genetic proof that it didn't work. For example I never had a blue or black pair give me an ash red.
 The other bottom one is used to start babies. They learn to
eat and how to enter my traps. They learn to come to me when I whistle. Teaching them to come when you call is very important and this can be done when it is feeding time. If you call them and then feed them allowing them all they can eat for 3min then take away the food. If there are some which take their time getting in to eat they will eat less and be much more willing to come in the next day. I have my kit box man door from the inside of the loft and a screened flight that I can let the birds into before letting them fly. The little door that I use for the birds to go in and out is in the center of the wall. This does not work well and I wish that I had put it closer to the roof. Birds naturally want to fly up when you are chasing them out. Tip: When I chase my birds out, I use a piece of 1x2 and I use it every time. This way if I open the kit box they are not wanting to go out until they see the stick, it keeps things peaceful. The kitbox floor is 36" wide and 30" deep. I use box perches that are tight to the wall, this works well as most birds will back up some when they poop as a result the poop goes to the floor. The perches are about 9-10" square.
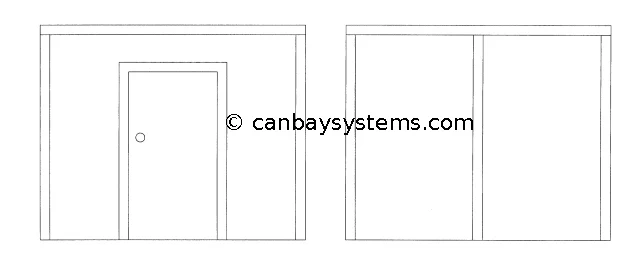
A veiw of my kit boxes with their doors taken of.
The other bottom one is used to start babies. They learn to
eat and how to enter my traps. They learn to come to me when I whistle. Teaching them to come when you call is very important and this can be done when it is feeding time. If you call them and then feed them allowing them all they can eat for 3min then take away the food. If there are some which take their time getting in to eat they will eat less and be much more willing to come in the next day. I have my kit box man door from the inside of the loft and a screened flight that I can let the birds into before letting them fly. The little door that I use for the birds to go in and out is in the center of the wall. This does not work well and I wish that I had put it closer to the roof. Birds naturally want to fly up when you are chasing them out. Tip: When I chase my birds out, I use a piece of 1x2 and I use it every time. This way if I open the kit box they are not wanting to go out until they see the stick, it keeps things peaceful. The kitbox floor is 36" wide and 30" deep. I use box perches that are tight to the wall, this works well as most birds will back up some when they poop as a result the poop goes to the floor. The perches are about 9-10" square.
A veiw of my kit boxes with their doors taken of.
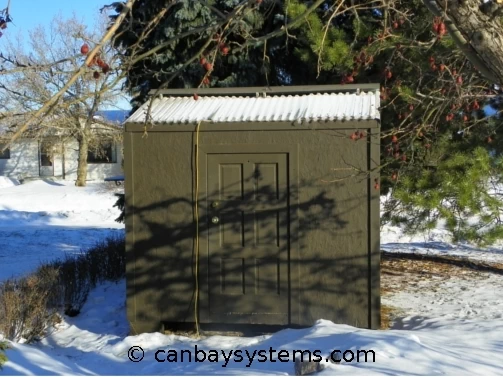
 Here is a photo of the out side showing the pigeon doors to the kit boxes. I don't compete because there is no club nearby, but I did fly my birds.
I had a pen (flight) that was divided into 4 compartments. When I put my kit out into it they would get all excited and as the large door (a complete side) on the flight was opened they were off and preforming. It worked well and it gave them a few moments to get organized as a group. Because I don't compete I just let the kits out for a fly. When they are finished I trap them right away. It helps avoid the hawks. Also note that I have made doors out of stucco wire for more air flow. Lots of air is good for the birds. Yes even when it is very cold out... look at the wild ones on steel beams.
My traps are made of pieces of 3"plumbing drain line. The thin wall stuff. I cut it about 6" on the longest side and at about 45 degrees.
Here is a photo of the out side showing the pigeon doors to the kit boxes. I don't compete because there is no club nearby, but I did fly my birds.
I had a pen (flight) that was divided into 4 compartments. When I put my kit out into it they would get all excited and as the large door (a complete side) on the flight was opened they were off and preforming. It worked well and it gave them a few moments to get organized as a group. Because I don't compete I just let the kits out for a fly. When they are finished I trap them right away. It helps avoid the hawks. Also note that I have made doors out of stucco wire for more air flow. Lots of air is good for the birds. Yes even when it is very cold out... look at the wild ones on steel beams.
My traps are made of pieces of 3"plumbing drain line. The thin wall stuff. I cut it about 6" on the longest side and at about 45 degrees.
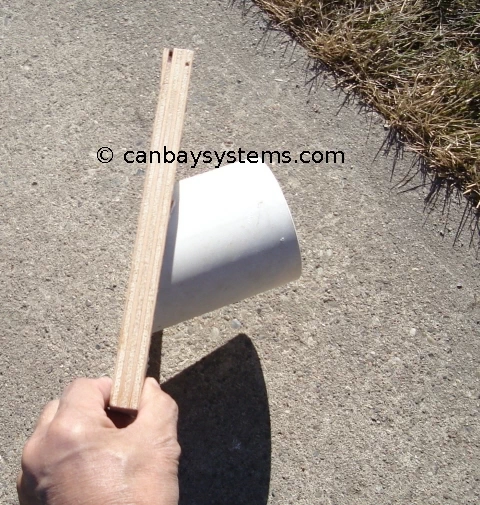 I might remake my traps out of black pipe because it would keep things a little darker in the kit box. I made a little sliding door and installed this into it. I works very well even for homer size birds. I also made 4' round holes in the roof of the flight pens, this works but very well once the birds learn to use them. But it is somewhat of a problem getting the squeakers to trust them. There is an advantage though. Leaving the holes open I only had one feral bird come in several years and there are many of them in my neighborhood.
 Please write me and let me know how it worked. Also if you have any questions that I have not explained I would be grateful if you let me know. I will gladly respond and also I will update my site for the next guy. Just use the email address on the photo below and click send. Thanks for visiting!
Click here to go to Canbaysystems home page.
Please write me and let me know how it worked. Also if you have any questions that I have not explained I would be grateful if you let me know. I will gladly respond and also I will update my site for the next guy. Just use the email address on the photo below and click send. Thanks for visiting!
Click here to go to Canbaysystems home page.
Please note: Every thing on my web-site including this page is copyright. Do not hotlink to my site with out my permission. To do so, I'll need a link to my site on your page. Sorry but I have found people selling these plans and stealing my bandwidth. I have put up this web-page to further the hobby and I wish to continue to do so. Please respect the effort that I put into it. I can be contacted at this email.