The Canbay Reef
My live rock page, well at first it will be my DIY concrete rock page.
I
have been researching some of the new ideas on the web. I have tried to
make a batch using salt. I used the very course stuff that is intended
for water softeners. Salt seems to make things very crumbly.
I have been trying to make aquarium reef rock. I have found recipes on line and it has been a task trying to get something that will have lots of porosity. These recipes for rock include salt. Salt should create poor concrete and that is what I am finding. First I tried 1part Portland 2 parts coarse salt and 2 parts coarse limestone sand. After 2 days it simply dissolved in water. Well at least I still have the lime stone sand. I tried a few more similar recipes and had similar results.
But I am starting to get some results. The last recipe that I tried was 1 cup Portland, 3 cups limestone sand, 1.5 cups coarse salt and then when I was forming it, I added some very coarse salt. First I put a layer of the lime stone sand into box, and then I put in a few handfuls of the wet mix. I spread it out and put pieces of the water softener salt on it. I covered the result with some more wet mix. As I was doing this I shaped it a little with the sand in the box. This one held together and now is in some fresh water getting aged.
I think I will go back to a mix of 1 part Portland and 4 parts coarse limestone sand. In the past I have used this recipe and made some large rock. A piece that was about 12 inches in diameter and about 3-4 inches thick would let water from the garden hose pass right through. Of course it was not full blast but it was a good stream. It worked really well in my tank.
I will be making a larger batch and posting some pics in a week. Thanks for stopping by.
Feb 23, 2010
I have tried several mixes and have not been getting results. My Portland cement was several years old and to my inexperienced eye it seemed to be OK. It still was powder and had never set up. However I had problems making things work. I would go back to the Internet and I would read how guys were happy with their home made live rock and wondered why mine did not turn out.
I drove down to HD and picked up a new bag of Portland cement. An hour later I had a rock starting to set up. The next day, a little less than 24 hours I had a rock that was well ... rock hard.
I have since made about 3 gallons of mixed rock. The one ingredient that I am having problems finding is rock salt. If I could find some salt with 1/4 inch grains I think it would be possible to put more of it into the batch. The only salt that I could find is water softener salt and it has chunks up to 2 inches long and 1 inch wide. I beat some with a hammer. This was a long process. Because the live rock in my tank is tufa from the local garden/landscape shop and it seems to be possibly giving of some thing into the water I want to get it out of the tank. I really need to make some rock so my recipes are rather safe.
1 cup cement
2 cups salt
2 cups ground limestone
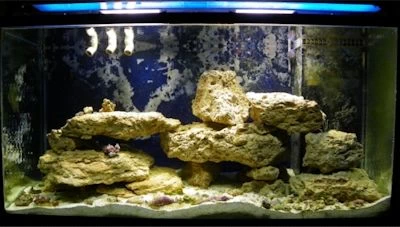
As soon as I have two batches curing I will start experimenting with some ideas that I have for long Tonga type rocks and other designs. I have some ideas about making a mold out a rubber like the stuff that is used to replicate antlers. But then antlers are more tapered. I also like just plain flat rock and larger cube type rock that can be stacked a little like the tufa I have in my tank right now. The following photo shows how the live rocks could be stacked to make room for fish/things to pass through. Sort of like natural caves. It just seems more natural to me. I will make my live rock with caves and make them easy to stack.
I have found a source of white Portland cement in Edmonton and a source of salt. The salt is available at Canadian Tire and the Portland cement can be found at stucco supply out lets. It is very expensive and I wonder if it is worth it. I had to pay $24 for a bag. The white seems to be a little easier to work with and makes strong live rock. White Portland cement has fewer impurities in it like iron. I also have tried and like the result added a little ground limestone. It is the fine stuff that is used as a cattle supplement. Here is what I have ended up for a recipe.
1 cup Portland cement
2 cups salt
3 cups ground limestone the coarse stuff used for chickens
1/2 cup of the fine ground limestone
Add just enough water to make the mix wet... do a little trial and error.
I found that using salt to form my live rock gives the best-finished look.
It is quite porous and a little heavy.
I have most of the rock that I will need to get my reef running. I is in water now and should be cured by the first week of April.
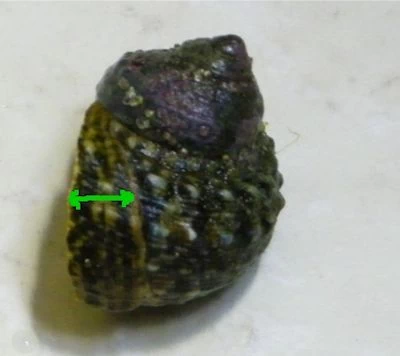
I need to take the tufa out of my tank, it is only growing coralline algae on one piece and it is adding stuff to the water, because the new growth on the snails shell is a different color. It is brown and I am guessing that maybe because of iron in the algae. I feel sure that it is because of the tufa rock.
Here is a picture of one of the snails. If you look closely you can see that the last part of the shell is much browner than the previous growth. The picture really does not show it well and it is taken out of the water. The section that is high lighted has grown in my tank.
March 24, 2010
Well I tufa the tufa rock out of my tank. I had a dinoflagellate bloom. I think that the main cause was the lack of buffering from the tufa rock. I will be posting on my reef aquarium page how I got past the problem and the steps that I try.
I am happy that I have been making rock to fit my tank. In a few weeks it should be ready to put in. I have set it up on a piece of board to see how it is going to fit. I like it.
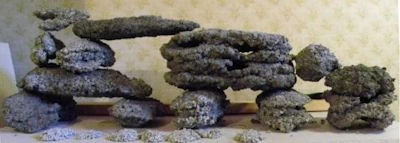
I will make a few new pieces of aragocrete, but this will be enough to get my tank running. I will be putting the base pieces in first, then if all checks out OK in a couple of days I will put in more of the aragocrete. Then wait and test again until it is all in. In the front I have a few cookies that I made with left over aragocrete, I will be using them to put frags on. The rock is quite porous and I have included ledges and small caves. Some of the caves are in the base rocks and they run sideways to the camera.
Here are some potos
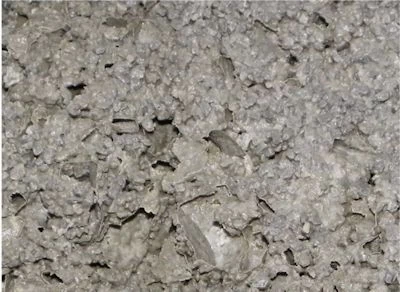
If you look closely you can make out the impressions from the salt that I used.
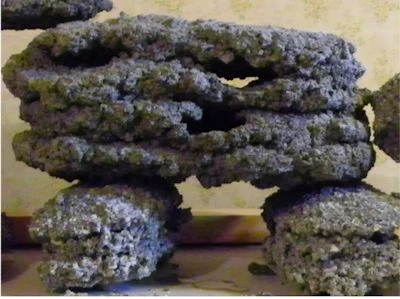
This is a rather large rock. It is quite porous and has some caves in it. The base rocks are arched a little to help keep them of the bottom.
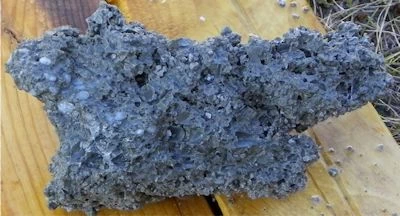
Photo of aragocrete, I just broke it and found some salt that was not disolved.
April 17, 2010
Here is a photo of a piece that I cut of the largest rock that I made. There is some salt that has not yet dissolved. I think that this salt is dissolving so slowly that it should not make a difference to my aquarium. But because I cut the rock I will soak it for a week to make sure. This is about 6-7 weeks after I made the aragocrete. I made the rock rather sturdy/strong by including some finer calcium sand into the concrete mix. Part of the rock is not porous enough, but most of it is very good. Click on the photo for a close up. Also it was easy enough to cut using a large screw driver, but strong enough not to crumble when handled. The section that had salt was deep in the center of the largest rock. The rock had a cross section of 6x12 inches and the area with salt was about 2x3 inches. I am very happy with it. Now because I have cut it I will be curing it for a few more days.
April 18, 2010
I have checked the PH and I was right. The freshly exposed surface needs to be cured. I have to soak the rock for a bit more.
You can clearly see in the cross section of the aragocrete rock the many little cavities that make the rock very porous.
The next time I am making rock I think that I will make it more like flat breads maybe 1-1.5 inches thick. That type of rock will be very handy to stack in a reef tank.
July 27, 2010
A brutally disappointing DIY project. I simply could not get a cure on those rocks. I ended up checking every thing. The sand that I used raised the PH of fresh water to about 8.3. I tried adding the salt that I used to see if there was something in it. Still about 8.3. My only conclusion is the cement that I have available this year is not going to work. I put the rock in the back of my pickup and drove down to the dump..... that cured it!
I bought some live rock out of someones tank and for now that is all that I will have. It is incredible rock with many things on it. I will put up some of the new reef tank pictures in a few days. For now the stuff is has a very tiny NO3 spike.... I mean so small that I can barely get it on a test.
I have seen some very nice base rock that does not come from the ocean and I will be soaking some of it in my sump.
I am starting some renovations in our basement and one of the rooms will be an aquarium room complete with a floor drain. I will post pictures of my reef tank and of the progress on my aquarium room.
Augest 2, 2010
Here are some pics of my new live rock, it is awesome!
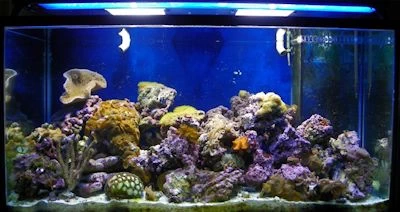
Soft corals
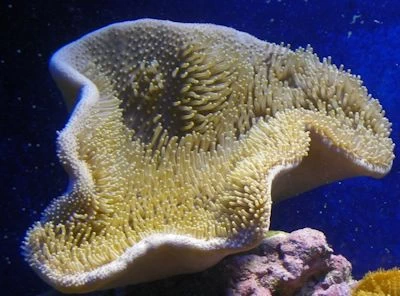
Toadstool Coral
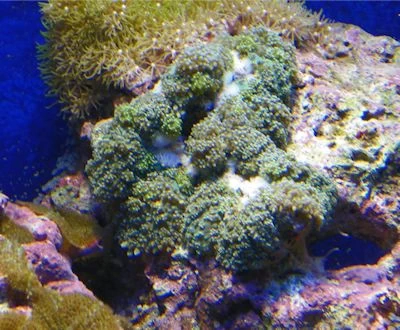
This coral was round a few days ago. Where it's mouth was is the center of the new divsion. You can see the rock under it in several places. It appears to be reproducing by dividing.
In the end there were ten new mushrooms.